Introduction to OpenResty
OpenResty is a dynamic web platform that integrates Nginx with the powerful Lua scripting language. It is designed to build scalable web applications, web services, and dynamic web gateways. By combining the high performance of Nginx with the flexibility of Lua, OpenResty enables developers to handle complex processing at the edge of the network.
What is OpenResty?
OpenResty extends Nginx by bundling it with a set of powerful Lua libraries and modules (known as LuaJIT). This allows embedding Lua scripts directly into the Nginx configuration, offering unparalleled flexibility for customizing request handling, routing, and response generation.
Key Features
- High Performance: Leverages Nginx’s event-driven architecture and LuaJIT’s speed for efficient request handling.
- Flexibility: Lua scripting enables dynamic content generation, complex routing, and custom logic.
- Extensibility: Easily integrates with various databases, caching systems, and other backend services.
- Modular Architecture: OpenResty modules simplify common tasks like routing, authentication, and data processing.
Prerequisites
Before diving into OpenResty, ensure you have the following:
- Basic Knowledge of Nginx: Understanding Nginx’s configuration and request-handling mechanisms.
- Familiarity with Lua: Basic knowledge of Lua programming language.
- Development Environment: Access to a Unix-based system (e.g., Linux or macOS) or Windows with a compatible environment.
Installation
Installing Dependencies
Depending on your operating system, you may need to install certain dependencies before installing OpenResty.
For Ubuntu/Debian
sudo apt-get update
sudo apt-get install -y curl gnupg2 ca-certificates lsb-release
For macOS
Use Homebrew to install dependencies.
brew update
brew install curl
Installing OpenResty
Using Official Packages (Recommended)
For Ubuntu/Debian:
Add the OpenResty Repository:
sudo apt-get install -y software-properties-common
sudo add-apt-repository -y "deb https://openresty.org/package/ubuntu $(lsb_release -sc) main"
Add the OpenResty GPG Key:
wget -qO - https://openresty.org/package/pubkey.gpg | sudo apt-key add -Update the Package List and Install:
sudo apt-get update
sudo apt-get install -y openresty
For macOS:
Use Homebrew to install OpenResty.
brew install openresty/tap/openresty
Building from Source
Download the Source Code:
wget https://openresty.org/download/openresty-VERSION.tar.gz
tar zxvf openresty-VERSION.tar.gz
cd openresty-VERSION/
Replace
VERSIONwith the latest version number.Configure and Compile:
./configure --with-luajit
make
sudo make install
Verifying Installation
Check the installed OpenResty version.
openresty -v
You should see output similar to:
nginx version: openresty/1.19.3.1
Basic Configuration
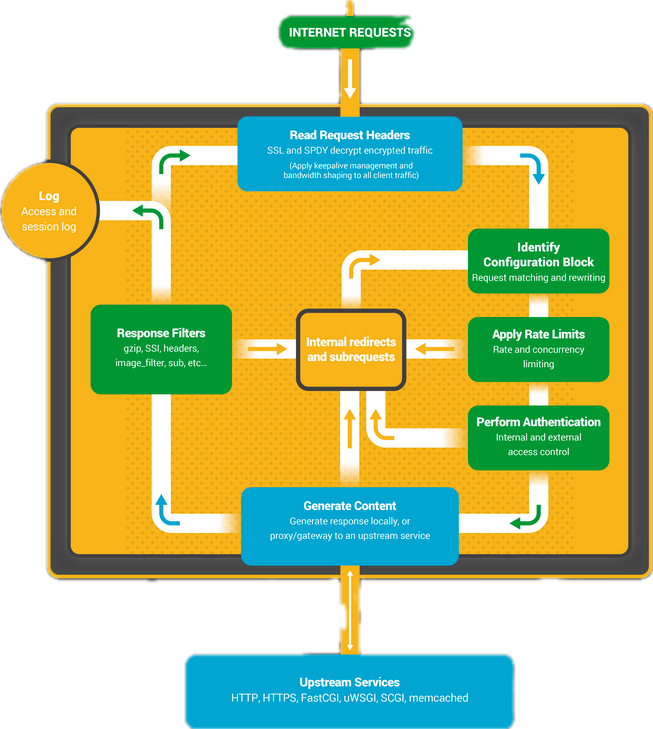
Understanding OpenResty’s Architecture
OpenResty maintains Nginx’s event-driven, asynchronous architecture while introducing Lua scripting capabilities. The primary components include:
- Nginx Core: Handles HTTP server functionality.
- LuaJIT: A Just-In-Time Compiler for Lua, providing high-speed execution.
- ngx_lua Module: Embeds Lua into Nginx’s request-processing phases.
- Additional Modules: OpenResty bundles various modules for enhanced functionality.
Configuring Nginx with Lua
The configuration files for OpenResty are similar to standard Nginx configurations but include Lua directives.
Example Configuration (/usr/local/openresty/nginx/conf/nginx.conf):
worker_processes  1;

events {
    worker_connections  1024;
}

http {
    include       mime.types;
    default_type  application/octet-stream;

    sendfile        on;
    keepalive_timeout  65;

    server {
        listen       8080;
        server_name  localhost;

        location / {
            default_type 'text/plain';
            content_by_lua_block {
                ngx.say('Hello, OpenResty!')
            }
        }
    }
}
Starting OpenResty
Use the following command to start the OpenResty server:
sudo openresty -c /usr/local/openresty/nginx/conf/nginx.conf
Visit http://localhost:8080/ in your browser to see the “Hello, OpenResty!” message.
Hello World Example
Let’s create a simple “Hello, World!” application using OpenResty.
Step 1: Create a Configuration File
Create a new configuration file or edit the existing one.
sudo nano /usr/local/openresty/nginx/conf/nginx.conf
Step 2: Add Lua Content
Insert the following content within the server block.
server {
    listen       8080;
    server_name  localhost;

    location /hello {
        default_type 'text/plain';
        content_by_lua_block {
            ngx.say('Hello, World from OpenResty!')
        }
    }
}
Step 3: Restart OpenResty
sudo openresty -s reload -c /usr/local/openresty/nginx/conf/nginx.conf
Step 4: Test the Endpoint
Navigate to http://localhost:8080/hello to see the message.
Handling Web Requests
OpenResty excels at handling web requests with Lua scripts. Let’s explore routing and processing different HTTP methods.
Routing with Lua
Implement dynamic routing using Lua.
Example:
server {
    listen       8080;
    server_name  localhost;

    location /api {
        content_by_lua_block {
            local request_path = ngx.var.uri
            if request_path == "/api/users" then
                ngx.say("User List")
            elseif request_path == "/api/orders" then
                ngx.say("Order List")
            else
                ngx.status = 404
                ngx.say("Not Found")
            end
        }
    }
}
Processing HTTP Methods
Handle different HTTP methods (GET, POST, PUT, DELETE).
Example:
server {
    listen       8080;
    server_name  localhost;

    location /api/resource {
        content_by_lua_block {
            local method = ngx.req.get_method()
            if method == "GET" then
                ngx.say("Handling GET request")
            elseif method == "POST" then
                ngx.say("Handling POST request")
            elseif method == "PUT" then
                ngx.say("Handling PUT request")
            elseif method == "DELETE" then
                ngx.say("Handling DELETE request")
            else
                ngx.status = 405
                ngx.say("Method Not Allowed")
            end
        }
    }
}
Working with Lua in OpenResty
Lua Modules and Libraries
Leverage Lua modules to organize and reuse code.
Example: Creating a Lua Module (/usr/local/openresty/lualib/my_module.lua):
-- my_module.lua
local _M = {}

function _M.greet(name)
    return "Hello, " .. name .. "!"
end

return _M
Using the Module in Nginx Configuration:
server {
    listen       8080;
    server_name  localhost;

    location /greet {
        default_type 'text/plain';
        content_by_lua_block {
            local my_module = require "my_module"
            local message = my_module.greet("OpenResty")
            ngx.say(message)
        }
    }
}
Impact of LuaJIT
LuaJIT is a Just-In-Time Compiler for Lua, providing significant performance improvements.
Benefits:
- Speed: Lua code runs at speeds comparable to C.
- Efficiency: Enables writing high-performance applications without sacrificing ease of development.
- Memory Management: Efficient memory usage, crucial for high-concurrency environments.
Considerations:
- Compatibility: Ensure LuaJIT is compatible with the Lua code and libraries you intend to use.
- Limitations: Certain Lua features might be less efficient or unsupported; refer to LuaJIT documentation for specifics.
Interacting with Databases
OpenResty seamlessly integrates with databases using Lua libraries.
Connecting to MySQL
Use the lua-resty-mysql library to interact with MySQL databases.
Installation:
Ensure you have LuaRocks installed, then install the library.
sudo luarocks install lua-resty-mysql
Configuration Example:
server {
    listen       8080;
    server_name  localhost;

    location /users {
        content_by_lua_block {
            local mysql = require "resty.mysql"
            local db, err = mysql:new()
            if not db then
                ngx.say("Failed to instantiate mysql: ", err)
                return
            end

            db:set_timeout(1000) -- 1 sec

            local ok, err, errno, sqlstate = db:connect{
                host = "127.0.0.1",
                port = 3306,
                database = "test_db",
                user = "test_user",
                password = "test_pass",
                charset = "utf8",
                max_packet_size = 1048576,
            }

            if not ok then
                ngx.say("Failed to connect: ", err, ": ", errno, " ", sqlstate)
                return
            end

            local res, err, errno, sqlstate = db:query("SELECT * FROM users")
            if not res then
                ngx.say("Bad result: ", err, ": ", errno, ": ", sqlstate, ".")
                return
            end

            -- Put it into the connection pool of size 100,
            -- with 10 seconds max idle time
            local ok, err = db:set_keepalive(10000, 100)
            if not ok then
                ngx.say("Failed to set keepalive: ", err)
                return
            end

            ngx.say(vim.inspect(res))
        }
    }
}
Explanation:
- Instantiate MySQL Object: Create a new MySQL instance.
- Set Timeout: Define a timeout for the connection.
- Connect to Database: Provide necessary connection parameters.
- Execute Query: Perform SQL queries and handle results.
- Connection Pooling: Use
set_keepaliveto reuse connections.
Connecting to Redis
Use the lua-resty-redis library to interact with Redis.
Installation:
sudo luarocks install lua-resty-redis
Configuration Example:
server {
    listen       8080;
    server_name  localhost;

    location /cache {
        content_by_lua_block {
            local redis = require "resty.redis"
            local red = redis:new()
            red:set_timeout(1000) -- 1 sec

            local ok, err = red:connect("127.0.0.1", 6379)
            if not ok then
                ngx.say("Failed to connect: ", err)
                return
            end

            -- Optional: authenticate
            local res, err = red:auth("your_password")
            if not res then
                ngx.say("Failed to authenticate: ", err)
                return
            end

            -- Set a key
            ok, err = red:set("my_key", "Hello, Redis!")
            if not ok then
                ngx.say("Failed to set key: ", err)
                return
            end

            -- Get the key
            res, err = red:get("my_key")
            if not res then
                ngx.say("Failed to get key: ", err)
                return
            end

            if res == ngx.null then
                ngx.say("Key not found.")
                return
            end

            ngx.say("Retrieved from Redis: ", res)

            -- Put it into the connection pool of size 100,
            -- with 10 seconds max idle time
            local ok, err = red:set_keepalive(10000, 100)
            if not ok then
                ngx.say("Failed to set keepalive: ", err)
                return
            end
        }
    }
}
Explanation:
- Instantiate Redis Object: Create a new Redis instance.
- Set Timeout: Define a timeout for the connection.
- Connect to Redis Server: Provide Redis server address and port.
- Authenticate (Optional): Authenticate if Redis requires a password.
- Execute Commands: Perform Redis commands like
SETandGET. - Connection Pooling: Reuse connections using
set_keepalive.
Caching Strategies
Implementing effective caching strategies can significantly enhance your application’s performance.
Using Lua for Caching
Store frequently accessed data in memory to reduce database load.
Example: Caching User Data
server {
    listen       8080;
    server_name  localhost;

    location /user {
        content_by_lua_block {
            local redis = require "resty.redis"
            local cjson = require "cjson"
            local red = redis:new()
            red:set_timeout(1000)

            -- Connect to Redis
            local ok, err = red:connect("127.0.0.1", 6379)
            if not ok then
                ngx.log(ngx.ERR, "Failed to connect to Redis: ", err)
                ngx.exit(500)
            end

            -- Try to get user data from Redis
            local user_id = ngx.var.arg_id
            if not user_id then
                ngx.say("User ID not provided")
                return
            end

            local res, err = red:get("user:" .. user_id)
            if res == ngx.null then
                -- Data not in cache, fetch from database (simulated)
                local user_data = {
                    id = user_id,
                    name = "John Doe",
                    email = "john.doe@example.com"
                }

                -- Simulate database delay
                ngx.sleep(0.1)

                -- Store in Redis with TTL of 60 seconds
                red:setex("user:" .. user_id, 60, cjson.encode(user_data))

                ngx.say(cjson.encode(user_data))
            else
                -- Data found in cache
                ngx.say(res)
            end

            -- Set keepalive
            local ok, err = red:set_keepalive(10000, 100)
            if not ok then
                ngx.log(ngx.ERR, "Failed to set keepalive: ", err)
                return
            end
        }
    }
}
Explanation:
- Attempt to Retrieve Data from Redis: Check if user data is present in the Redis cache.
- Fetch from Database if Cache Miss: If not found, retrieve from the database (simulated here).
- Store Fetched Data in Redis: Cache the retrieved data with an expiration time (
TTL). - Respond to Client: Return the user data, either from cache or database.
Utilizing Nginx Caching
Leverage Nginx’s built-in caching mechanisms for static and dynamic content.
Example: Caching Responses with proxy_cache
http {
    proxy_cache_path /var/cache/nginx levels=1:2 keys_zone=my_cache:10m max_size=10g inactive=60m use_temp_path=off;

    server {
        listen 8080;
        server_name localhost;

        location /api {
            proxy_cache my_cache;
            proxy_pass http://backend_server;

            proxy_set_header Host $host;
            proxy_set_header X-Real-IP $remote_addr;

            # Cache based on query parameters
            proxy_cache_key "$scheme$request_method$host$request_uri";

            # Cache validity
            proxy_cache_valid 200 302 10m;
            proxy_cache_valid 404      1m;
        }
    }
}
Explanation:
- Define Cache Path and Zone: Configure where and how Nginx stores cached data.
- Enable Caching in Location Block: Apply caching to specific routes or endpoints.
- Set Cache Keys: Define how cache entries are identified.
- Specify Cache Validity: Determine how long different response statuses are cached.
Security Best Practices
Ensuring the security of your OpenResty applications is paramount. Implement the following best practices to safeguard your applications.
Input Validation
Always validate and sanitize user inputs to prevent injections and other attacks.
Example: Validating Query Parameters
server {
    listen       8080;
    server_name  localhost;

    location /search {
        content_by_lua_block {
            local args = ngx.req.get_uri_args()
            local query = args.query

            if not query or #query < 3 then
                ngx.status = 400
                ngx.say("Invalid query parameter")
                return
            end

            -- Proceed with processing
            ngx.say("Search results for: ", query)
        }
    }
}
Securing Lua Scripts
Restrict access to Lua scripts and handle errors gracefully.
Example: Error Handling in Lua
server {
    listen       8080;
    server_name  localhost;

    error_page 500 502 503 504 /50x.html;

    location = /50x.html {
        root   /usr/share/nginx/html;
    }

    location /data {
        content_by_lua_block {
            local status, err = pcall(function()
                -- Your Lua code here
                error("Simulated error")
            end)

            if not status then
                ngx.log(ngx.ERR, "Lua error: ", err)
                ngx.status = 500
                ngx.say("Internal Server Error")
            end
        }
    }
}
Rate Limiting
Prevent abuse by limiting the number of requests a client can make.
Example: Implementing Rate Limiting with Lua
http {
    lua_shared_dict limits 10m;

    server {
        listen 8080;
        server_name localhost;

        location /api/ {
            access_by_lua_block {
                local limit = require "resty.limit.req"
                local lim, err = limit.new("limits", 100, 200) -- 100 requests per second with burst of 200
                if not lim then
                    ngx.log(ngx.ERR, "failed to instantiate a resty.limit.req object: ", err)
                    return ngx.exit(500)
                end

                local key = ngx.var.binary_remote_addr
                local delay, err = lim:incoming(key, true)
                if not delay then
                    if err == "rejected" then
                        return ngx.exit(429)
                    end
                    ngx.log(ngx.ERR, "failed to limit request: ", err)
                    return ngx.exit(500)
                end

                if delay >= 0.001 then
                    ngx.sleep(delay)
                end
            }

            proxy_pass http://backend_server;
        }
    }
}
Explanation:
- Define Shared Dictionary: Allocate shared memory for storing rate-limiting data.
- Instantiate Rate Limiter: Use
resty.limit.reqto set request limits. - Identify Clients: Use client’s IP address as the identifier.
- Enforce Limits: Allow or reject requests based on defined thresholds.
Performance Optimization
Optimize your OpenResty applications to handle high traffic efficiently.
Efficient Lua Coding
Write optimized Lua code to reduce execution time and memory usage.
Example: Avoiding Unnecessary Table Creations
-- Inefficient: Creates new table for each user attributes
local function process_users(users)
    local results = {}
    for i, user in ipairs(users) do
        -- Creates a new temporary table for each iteration
        local attributes = {
            name = user.name,
            age = user.age,
            status = "active",
            last_login = os.time()
        }
        results[i] = attributes
    end
    return results
end

-- Efficient: Reuses a single template table
local function process_users(users)
    local results = {}
    -- Create template table once
    local template = {
        name = "",
        age = 0,
        status = "active",
        last_login = 0
    }

    for i, user in ipairs(users) do
        -- Reuse template structure via metatable
        local attributes = setmetatable({}, {__index = template})
        attributes.name = user.name
        attributes.age = user.age
        attributes.last_login = os.time()
        results[i] = attributes
    end
    return results
end
(Note: The above example shows a common pattern; optimize further as needed.)
Nginx Optimization
Tweak Nginx settings for better performance.
Example: Increasing Worker Connections
worker_processes auto;

events {
    worker_connections 4096;
    multi_accept on;
}
Explanation:
worker_processes auto: Automatically sets the number of worker processes based on available CPU cores.worker_connections: Increases the number of simultaneous connections each worker can handle.multi_accept on: Workers accept all new connections at once, improving connection handling under heavy load.
Debugging and Logging
Effective debugging and logging are essential for maintaining and troubleshooting applications.
Setting Up Logging
Configure Nginx and Lua to log important events and errors.
Nginx Logging Configuration:
http {
    log_format main '$remote_addr - $remote_user [$time_local] "$request" '
                    '$status $body_bytes_sent "$http_referer" '
                    '"$http_user_agent" "$http_x_forwarded_for"';

    access_log /var/log/nginx/access.log main;
    error_log /var/log/nginx/error.log warn;

    server {
        listen 8080;
        server_name localhost;

        location / {
            content_by_lua_block {
                ngx.log(ngx.INFO, "Handling request to /")
                ngx.say("Hello, OpenResty!")
            }
        }
    }
}
Lua Logging:
Use ngx.log to log messages at various levels (DEBUG, INFO, WARN, ERR, etc.).
ngx.log(ngx.INFO, "This is an informational message")
ngx.log(ngx.ERR, "This is an error message")
Debugging Lua Scripts
Use LuaJIT’s built-in debugging tools and external libraries.
Using debug Library:
content_by_lua_block {
    local function faulty_function()
        error("Something went wrong!")
    end

    local status, err = pcall(faulty_function)
    if not status then
        ngx.log(ngx.ERR, "Error: ", err)
        ngx.status = 500
        ngx.say("Internal Server Error")
    end
}
External Libraries:
- Lua Inspect: For inspecting variables and data structures.
- Mobdebug: For remote debugging with zero-brain.
Example: Remote Debugging with Mobdebug
Install Mobdebug:
luarocks install mobdebugConfigure Lua Code:
content_by_lua_block {
    local mobdebug = require "mobdebug"
    mobdebug.listen() -- Wait for debugger to connect

    -- Your Lua code here
    ngx.say("Debugging OpenResty with Mobdebug")
}
Connect Debugger:
Use an IDE like ZeroBrane Studio to connect to Mobdebug.
Deployment
Deploy OpenResty applications efficiently to production environments.
Preparing for Production
Optimize Configuration:
- Disable unnecessary modules and logging.
- Fine-tune worker processes and connections.
Secure the Server:
- Use HTTPS with TLS certificates.
- Implement firewall rules and security groups.
Test Thoroughly:
- Perform load testing and stress testing.
- Ensure all functionalities work as expected.
Managing Configuration
Use environment variables and separate configuration files for different environments.
Example: Using Environment Variables in Lua
content_by_lua_block {
    local db_host = os.getenv("DB_HOST") or "127.0.0.1"
    local db_port = tonumber(os.getenv("DB_PORT")) or 3306

    ngx.say("Database Host: ", db_host)
    ngx.say("Database Port: ", db_port)
}
Continuous Integration and Deployment (CI/CD)
Automate the build, test, and deployment processes using CI/CD tools.
Example: GitLab CI Configuration (.gitlab-ci.yml):
stages:
  - build
  - test
  - deploy

build:
  stage: build
  script:
    - echo "Building OpenResty application..."
    - # Add build commands here
  artifacts:
    paths:
      - build/

test:
  stage: test
  script:
    - echo "Running tests..."
    - # Add test commands here

deploy:
  stage: deploy
  script:
    - echo "Deploying to production..."
    - ssh user@server "sudo systemctl restart openresty"
  only:
    - master
Advanced Topics
Microservices with OpenResty
Leverage OpenResty for building microservices architectures.
Key Considerations:
- Service Isolation: Each microservice should handle a specific functionality.
- Inter-Service Communication: Use HTTP/HTTPS, gRPC, or message queues (e.g., Kafka) for communication between services.
- Service Discovery: Implement service discovery mechanisms to manage dynamic service instances.
- Load Balancing: Utilize Nginx’s load balancing features or service meshes like Istio.
Example: Building a Simple Microservice
server {
    listen 8080;
    server_name localhost;

    location /service1 {
        content_by_lua_block {
            -- Service 1 logic
            ngx.say("Response from Service 1")
        }
    }

    location /service2 {
        content_by_lua_block {
            -- Service 2 logic
            ngx.say("Response from Service 2")
        }
    }
}
WebSockets Integration
Enable real-time communication using WebSockets.
Example: Handling WebSockets with Lua
Install lua-resty-websocket:
sudo luarocks install lua-resty-websocketConfiguration:
server {
    listen 8080;
    server_name localhost;

    location /ws {
        content_by_lua_block {
            local websocket = require "resty.websocket.server"
            local wb, err = websocket:new{
                timeout = 5000,  -- in milliseconds
                max_payload_len = 65535
            }

            if not wb then
                ngx.log(ngx.ERR, "Failed to new websocket: ", err)
                return ngx.exit(444)
            end

            while true do
                local data, typ, err = wb:recv_frame()
                if not data then
                    if err ~= "timeout" then
                        ngx.log(ngx.ERR, "Failed to receive frame: ", err)
                        wb:send_close(1002, "Failed to receive frame")
                    end
                    return
                end

                if typ == "close" then
                    local bytes, err = wb:send_close(1000)
                    if not bytes then
                        ngx.log(ngx.ERR, "Failed to send close: ", err)
                    end
                    return
                elseif typ == "ping" then
                    local bytes, err = wb:send_pong()
                    if not bytes then
                        ngx.log(ngx.ERR, "Failed to send pong: ", err)
                    end
                elseif typ == "pong" then
                    -- handle pong
                elseif typ == "text" then
                    -- Echo the received message
                    local bytes, err = wb:send_text(data)
                    if not bytes then
                        ngx.log(ngx.ERR, "Failed to send text: ", err)
                        return
                    end
                elseif typ == "binary" then
                    -- Handle binary data if needed
                end
            end
        }
    }
}
Explanation:
- Establish WebSocket Connection: Upgrade the HTTP request to a WebSocket connection.
- Handle Frames: Receive and respond to different frame types (
text,binary,ping,pong,close). - Echo Messages: Echo back received text messages for demonstration.
API Gateway with OpenResty
Use OpenResty as an API Gateway to manage, route, and secure API traffic.
Key Features:
- Routing and Load Balancing: Direct requests to appropriate backend services.
- Authentication and Authorization: Implement security measures to protect APIs.
- Rate Limiting: Control the rate of incoming requests.
- Caching and Compression: Optimize performance by caching responses and compressing data.
Example: Simple API Gateway Configuration
http {
    lua_shared_dict limits 10m;
    proxy_cache_path /var/cache/nginx levels=1:2 keys_zone=my_cache:10m max_size=1g inactive=60m use_temp_path=off;

    server {
        listen 8080;
        server_name localhost;

        location /api/service1 {
            proxy_pass http://service1_backend;
            proxy_set_header Host $host;
            proxy_set_header X-Real-IP $remote_addr;

            # Caching
            proxy_cache my_cache;
            proxy_cache_valid 200 302 10m;
            proxy_cache_valid 404      1m;
        }

        location /api/service2 {
            proxy_pass http://service2_backend;
            proxy_set_header Host $host;
            proxy_set_header X-Real-IP $remote_addr;

            # Rate Limiting
            access_by_lua_block {
                -- Implement rate limiting logic
            }
        }

        location /auth {
            access_by_lua_block {
                -- Implement authentication logic
            }
            proxy_pass http://auth_backend;
        }
    }
}
Explanation:
- Routing: Direct API requests to respective backend services.
- Caching: Cache responses from
service1_backendto improve performance. - Rate Limiting: Apply rate limiting on
service2_backend. - Authentication: Add authentication checks for sensitive endpoints.
Deep Into API Gateway Configuration
- Shared Memory and Cache Configuration:
http {
    # Allocates 10MB shared memory for rate limiting
    lua_shared_dict limits 10m;

    # Cache configuration
    proxy_cache_path /var/cache/nginx  # Cache directory
        levels=1:2                     # Two-level directory hierarchy
        keys_zone=my_cache:10m         # Allocates 10MB for cache keys
        max_size=1g                    # Maximum cache size
        inactive=60m                   # Remove items inactive for 60 minutes
        use_temp_path=off;             # Don't use temporary path
}
- Service 1 Endpoint with Caching:
location /api/service1 {
    # Forward requests to service1_backend
    proxy_pass http://service1_backend;

    # Pass client information
    proxy_set_header Host $host;
    proxy_set_header X-Real-IP $remote_addr;

    # Caching configuration
    proxy_cache my_cache;              # Use cache zone defined above
    proxy_cache_valid 200 302 10m;     # Cache successful responses for 10 mins
    proxy_cache_valid 404      1m;     # Cache 404s for 1 min
}
- Service 2 Endpoint with Rate Limiting:
location /api/service2 {
    proxy_pass http://service2_backend;
    proxy_set_header Host $host;
    proxy_set_header X-Real-IP $remote_addr;

    # Here's an implementation of rate limiting:
    access_by_lua_block {
        local limit_req = require "resty.limit.req"

        -- Create limiter: 10 requests/second with 20 request burst
        local lim, err = limit_req.new("limits", 10, 20)
        if not lim then
            ngx.log(ngx.ERR, "failed to instantiate limiter: ", err)
            return ngx.exit(500)
        end

        -- Get client IP
        local key = ngx.var.binary_remote_addr

        -- Check rate limit
        local delay, err = lim:incoming(key, true)
        if not delay then
            if err == "rejected" then
                return ngx.exit(429)  -- Too Many Requests
            end
            ngx.log(ngx.ERR, "failed to limit req: ", err)
            return ngx.exit(500)
        end

        -- Apply delay if necessary
        if delay > 0 then
            ngx.sleep(delay)
        end
    }
}
- Authentication Endpoint:
location /auth {
    access_by_lua_block {
        local function validate_token(token)
            -- Example token validation
            if not token then
                return false
            end
            -- Add your token validation logic here
            return true
        end

        -- Get Authorization header
        local auth_header = ngx.req.get_headers()["Authorization"]
        if not auth_header then
            ngx.status = 401
            ngx.say("Missing authorization header")
            return ngx.exit(401)
        end

        -- Extract token
        local _, _, token = string.find(auth_header, "Bearer%s+(.+)")
        if not token then
            ngx.status = 401
            ngx.say("Invalid token format")
            return ngx.exit(401)
        end

        -- Validate token
        if not validate_token(token) then
            ngx.status = 401
            ngx.say("Invalid token")
            return ngx.exit(401)
        end
    }
    proxy_pass http://auth_backend;
}
- Complete Implementation with Error Handling:
-- common/auth.lua
local _M = {}

function _M.validate_token(token)
    -- JWT validation example
    local jwt = require "resty.jwt"
    local jwt_secret = "your-secret-key"

    local jwt_obj = jwt:verify(jwt_secret, token)
    if not jwt_obj.verified then
        return false, "Invalid token"
    end

    return true, jwt_obj.payload
end

return _M

-- common/rate_limit.lua
local _M = {}

function _M.new_limiter(limit_key, rate, burst)
    local limit_req = require "resty.limit.req"
    local lim, err = limit_req.new("limits", rate, burst)

    if not lim then
        return nil, "failed to create limiter: " .. (err or "unknown")
    end

    return lim
end

function _M.check_limit(lim, key)
    local delay, err = lim:incoming(key, true)

    if not delay then
        if err == "rejected" then
            return nil, "rate_limited"
        end
        return nil, "internal_error"
    end

    return delay
end

return _M

-- common/cache.lua
local _M = {}

function _M.get_cached_response()
    local cache_ngx = ngx.shared.my_cache
    local cache_key = ngx.var.request_uri

    local value = cache_ngx:get(cache_key)
    if value then
        return value
    end

    return nil
end

function _M.set_cached_response(response, ttl)
    local cache_ngx = ngx.shared.my_cache
    local cache_key = ngx.var.request_uri

    local success, err = cache_ngx:set(cache_key, response, ttl)
    if not success then
        ngx.log(ngx.ERR, "failed to cache response: ", err)
    end
end

return _M
Resources and Further Reading
Official Documentation
- OpenResty Official Site: https://openresty.org/
- OpenResty GitHub Repository: https://github.com/openresty/openresty
- LuaJIT Documentation: https://luajit.org/
- lua-resty Libraries: https://github.com/openresty/lua-resty-*
Books and Articles
- “OpenResty: High Performance Web Platform Using Lua” by Jay Huang
- “Programming OpenResty” by Noel Rappin
- “Mastering OpenResty” by Dr. Mai Phan and Jay Huang
Online Tutorials and Courses
- OpenResty Tutorial by OpenResty.org: https://openresty.org/en/
- OpenResty Introduction on DigitalOcean: https://www.digitalocean.com/community/tutorials/how-to-install-openresty-on-ubuntu-18-04
- YouTube Video Tutorials:
Community and Support
- OpenResty Mailing List: Subscribe to stay updated with the latest news and updates.
- OpenResty Forums: Participate in discussions and seek help from the community.
- Stack Overflow: Tag questions with
openrestyorluato get assistance. - Gophers Slack: Join the Gophers Slack Workspace for real-time discussions and support.
Conclusion
OpenResty is a powerful platform that combines the robust capabilities of Nginx with the flexibility of Lua scripting. This comprehensive tutorial has walked you through the essentials of setting up, configuring, and optimizing OpenResty for various web applications. By mastering OpenResty, you can build high-performance, scalable, and secure web services tailored to your specific needs.
Happy Coding!